I had to remove the studs on C1535 to pull the tonearm assembly. Only one wire was actually connected to anything in the cabinet, so that was easy to disconnect. The studs on C1538 were missing altogether, so it was a simple matter of lifting the whole assembly out. Luckily, they are pretty standard screws and will be easy to replace.
I took both tonearm assemblies completely apart. I went so far as to disassemble the headshell and the cartridge from C1538. I determined that I will need to do the following to restore the tonearms to their original glory:
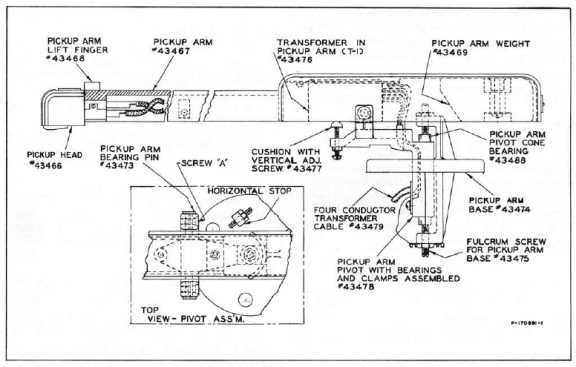
C1538:
Pickup Arm Pivot Assembly (part #43478)
- Make new rubber cushion for vertical adjustment screw (part #43477). The original cushion is gone.
- Make new pivot cone bearing (part #43488). This will be a little bit tricky. The part consists of a cup with four tiny ball bearings. The bearings are held by a small washer that's press-fitted in place. Should be very do-able with the lathe.
Pickup Arm Base (part #43474)
- Make two new fulcrum screws. The originals are both broken
- Replace all three rubber washers.
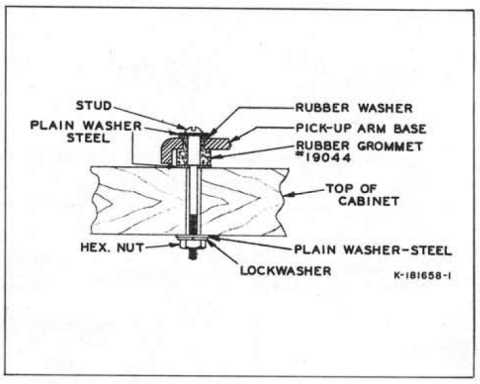
- Replace all three rubber mounting grommets (part #19044)
- Replace all three mounting studs as well as lock washers, plain washers, and hex nuts.
Pickup Arm (part #43467)
- Make and connect new four-conductor transformer cable.
- Replace stylus.
- Repair mounting screw hole on the right side of the pickup head. The original has been reamed out a bit by someone who got careless with a screwdriver.
- Replace both pickup head mounting screws (missing).
That seems to be about everything for the tonearm assemblies. I will probably start my actual work with the cabinets. I'll post my "to-do" list for that job later. Until then...

Friday, Feb 27, 2009:
I started taking the bits and pieces off of C1535 today. The set screw in the "on/off" switch was frozen, so I sprayed it with some WD-40 and I'll try again tomorrow. (Actually, this was converted to a speed change switch when the 45rpm kit was added but I will be re-converting it.) The other switches and knobs came off with no problems. I also removed the RCA "meatball" from the door. I labeled and bagged everything. I'm putting all the smaller parts in Ziploc freezer backs and marking the bags with a Sharpie. All the bags are then stored in a plastic storage box.
Next, I had to figure out how to remove the chrome trim strips. I was under the impression that they were solid, thick strips. I was wrong. They are actually a channel section and are attached to a series of mounting strips which are nailed to the cabinet. I did up a quick diagram to show what I mean:
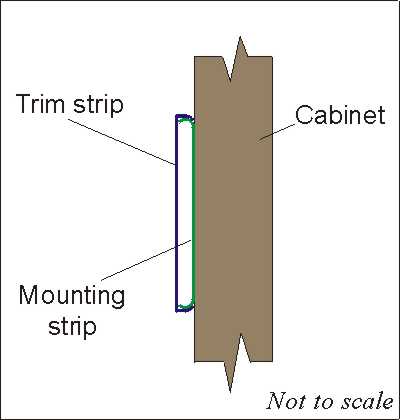
figure 3
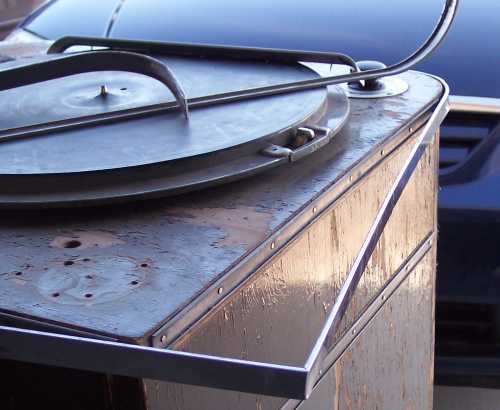
I found that with a thin screwdriver and a lot of patience, I was able to get the trim to separate from the mounting strip without damaging anything. I had to work it a little bit at a time but it eventually yielded to my efforts. Here's a picture that shows the mounting strips on C1535 after the lower trip strip has been removed:
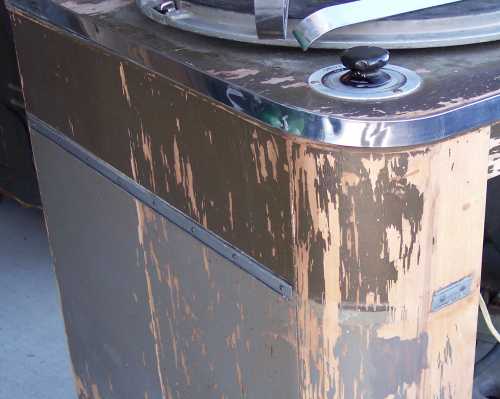
And in this photo, you can see the upper trim strip after it has been partially removed. You can also see the lower trim strips sitting on the platter.
I didn't have a lot of time today so I found a place to store the trim where it wouldn't get beat up and called it a day.
Saturday, Feb 28, 2009:
I worked on C1535 today, trying to take everything out of the cabinet so I can start refinishing it. It sounds easy but in reality, it's a real pain. The cabinets on these things look so empty when you look into them. However, once I got started, parts started coming out like clowns out of a circus car. At the end of the day, I had to give up on the platter assembly. The flywheel is too big to go up through the hole and the platter is too big to go the other way. I loosened the locknut on the flywheel but it didn't want to come off the shaft. I suspect it will require some sort of gear puller or something to get it off. I'll try again tomorrow. Here's a digram of the drive system.
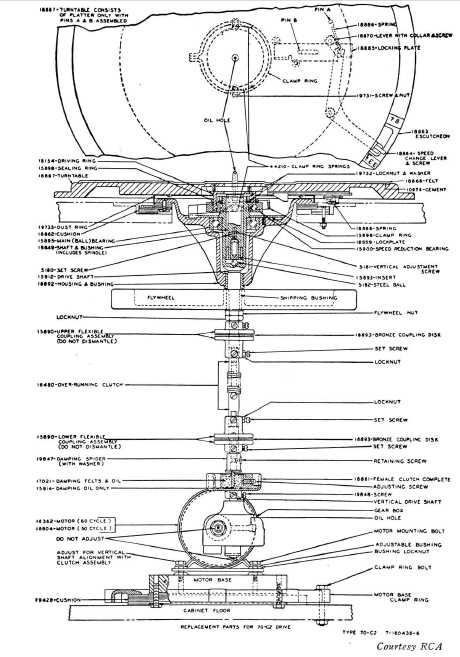
figure 4
I also had a bit of trouble getting the motor out. The rubber cushion appears to be stuck to the bottom of the cabinet. I don't want to tear the rubber so I'll try a different angle tomorrow. I'll study the drawings again tonight and find out if there's anything I've missed. I eventually unbolted the motor from the mount to remove it and give me room to work.
I did manage to get all the electronics out. The filter network is original and made up of a series of wax capacitors of different values. I will almost certainly have to replace them. I have to decide if I want to do a straight up replacement or stuff the old wax caps with new ones and seal them up to preserve the authentic look. We'll see. Most of the screws and bolts came out easily, in spite of the fact that many had rust on them. The exception was the set screw on the "on/off" knob. After soaking in WD-40 for more than 24 hours, it was still rusted solid. I hated to do it as RCA knobs are not exactly plentiful, but I drilled it out. Oh well, I have a couple of spares.
Tomorrow, I need to try to remove the platter/flywheel assembly and the motor mount. At that point, I'll have everything out and I'll be able to start stripping the cabinet to get it ready for painting.
Friday, Mar 13, 2009:
I got a lot of work done, but it wasn't really exciting. Using a scraper, I got all the old paint off of the cabinet front, all of one side, and most of the other side. I also was able to get quite a lot of paint off the top of the cabinet. I wanted to scrape first before going to other methods for a couple of reasons: First, little paint chips are much easier to contain than the dust I would get from sanding. I don't have to worry about breathing in Lord-knows-what. This paint is about 70 years old and no doubt full of all sorts of radioactive nastiness. Second, because of the weathering of the original paint, I am able to get most of it to just chip off, exposing the bare wood without damaging it or removing any of it. I will probably use a chemical stripper to remove whatever I can't scrape off. I want to avoid sanding as much as possible to leave the wood intact. After applying fillers wherever necessary, I will have to do some finish sanding but I will use mostly fine-grit papers. When I start working on C1538, I will probably have to use more chemical stripper, since the paint is in better condition on that cabinet.
I will probably scrape any gunk from the inside of the cabinet, then give it a light sanding without worrying too much about removing all the paint. It looks like it was originally just painted with silver spray paint with no attempt to put a nice finish on it. There is a paper label on the inside back panel that I want to preserve. I will try to carefully steam it off. If this doesnt't work, I will probably just mask it.
After I get the cabinet down to bare wood, I will work on the extra holes in the top. My plan is to use a forstner (sp?) bit to drill out the holes to a common size then fill them with glued-in hardwood plugs that I will cut to be a tight fit. This should make for an invisible repair once it's painted. On the smaller screw holes, I will just use some sort of wood filler. I will post pictures once I have the whole cabinet stripped.
Friday, Mar 20, 2009:
More scraping today to get the cabinet of C1535 ready to re-paint. This is important and necessary work but very un-exciting. I've gotten the front and both sides done, as well as most of the top. In my next go at this, I will try to finish up the top and then scrape the back. The top will require a little bit of chemical treatment where the paint was protected by the turntable platter. I will also go after the interior. I plan to give it a thorough scraping to remove accumulated the gunk of 70 years then a light sanding. I will try to match the silver paint used on the inside as closely as possible. I have not started on the cabinet door, other than to remove the hardware. For some reason, it doesn't show the weathering like the rest of the cabinet. I will use a chemical stripper on it.
Saturday, Mar 28, 2009:
Still more scraping. I finished the back and most of the top. There are still a few small areas on the top where I will have to use chemicals, especially beneath where the platter goes.
Sunday, Apr 5, 2009:
I finally picked up a bottle of stripper. I got the orange gel stuff that's supposed to be non-toxic. Unfortunately, it's not very effective. I applied some today and left it for several hours. The results were very inconsistent. Some of the remaining paint turned to a sort of rubbery goo and came off with a scraper. But it will apparently require several applications to get all the paint off. I will probably use something stronger (and more effective!) when it comes time to strip C1538.
Saturday, May 23, 2009:
I haven't gotten much work done lately on the turntables. I have been travelling a lot in the last few weeks, for business and plasure. I've done a little bit on the inside of the cabinet of 1535, mostly cleaning up dirt and scraping. I don't really have to get down to bare wood on the inside as it just had a coat of silver spray paint on it originally. I probably won't get too much work done over the summer months.
Frday, June 19, 2009:
I have done a little bit of work on various components from 1535 but I'll wait until I wade in a little deeper to do any major updates.
Friday, September 18, 2009:
Well, I am finally back at it again. I didn't actually get much done today but I spent some time on the cabinet, trying to get the last bits of paint off the outside. I didn't get all of it but I can see the light at the end of the tunnel.
Sunday, September 20, 2009:
I got a couple of things accomplished today. First, I got the "Model Number" label off the inside of the cabinet. It took some doing but I finally managed to get it off in one piece by using a steamer. I had to steam it for about 30 minutes and I still ended with a layer of paint stuck to the back of the label. Now I have to decide if I want to put the original label back in or make a repro. I'll probably do a repro but I haven't decided yet. Anyway, here's a rough scan (before I've pressed it and removed the glue).

Second, I did some more clean-up work inside the cabinet, removing more of the accumulated crap of 70 years. As with the outside, it's not quite ready for paint yet but it's getting close.
Finally, I found a 3/8" aluminum rod at my local hardware store. This will be used to make the new pivot bearings for the tonearms on both turntables. I recently found my Sherline jeweler's lathe/mill so the bearings should be a piece of cake. I will need to locate a few tiny ball bearings as well. They actually had some at the hardware store but at 5/32" I think they are just slightly too large. It shouldn't be too hard to find the ones I need.
© 2009-2010 KWD Radio